Software User Guide
Intro
Every project you will work on varies, so some of these instructions may not be applicable to your project. Be sure as you work to keep track of your notes in your Photo Production Log. Good luck!
Installing Software
The Zcapture software is available for download. If you have purchased your software you will receive your license key within one business day.
If you encounter a problem with the application crashing when you are licensing it you are missing an important update from Microsoft. Please download and install this update from Microsoft to fix the issue.
Download page: http://www.microsoft.com/en-us/download/details.php?id=17718
or
Direct Download Link (faster): Direct Download
Import Image Files
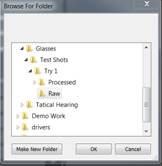
Import the files either by connecting the camera via USB cable to the computer or by removing the memory chip. Once on the computer, import the photos by copying the files and pasting them into the folder labeled Raw Images that corresponds to your product. For example, if you just finished your second try of photographing the Blue Glasses, you would put the 50 raw images in the following directory:
Client Work / Reading Glasses April 2013 / Blue Glasses / Try 2 - Blue Glasses / Raw Images - Blue Glasses Try 2
You do not need to rename your individual images as long as they are in the proper directory. Sometimes you may accidentally grab too many images, but you can fix this in the Z-Capture Software.
Process Images
Import to Z-Capture and Preview Rotation
Next it is time to edit your photo sequence in the Z-Capture Software. Begin by opening the Z-Capture software and locating your raw photos in the source file directory. You do not need to locate the individual photos, just the file folder containing them. Follow these directions below:
Click on the grey box by the side of Source Directory:
2.Locate your raw files in the file directory:
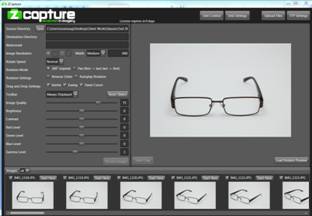
3.Once you hit ok, your 50 images will import into Z-Capture and your first image will appear in the preview:
To check for any inconstancies, jumps, or other problems, click the "Load Rotator Preview" button located on the bottom right beneath your preview image. Once this has loaded, you can view the movie of it rotating or manually move the video by clicking on the image and dragging left or right. Watch the video a few times to watch for any jumps or other problems. If these problems occur, you may need to reshoot. Here are a few things to watch for:
Composition: You should have tested your composition before shooting, but sometimes there are still surprises. Make sure that your product doesn't leave the frame, or that an important part of the subject isn't hidden behind the video controls. If your composition is not right, go fix any problems in your setup and reshoot.
Wobbling Subject: Sometimes a product may not be secured well enough and may move frame to frame, creating a wobble. Go back and reshoot your subject.
Jumps or Pauses: Jumps or pauses can indicate that you have too many frames, the subject moved between the first and last frames, the Z-Capture Device did not rotate properly, or you did not include all your images when you copied the file over.
Too Many Frames: If you have too many frames (like 51 images instead of 50) you can fix this right in the Z-Capture software. You probably selected an extra frame at the beginning of your sequence (or end of it). Go to the bottom of your screen and view the timeline. You'll notice by default that the first frame is selected to be the first one in the sequence and will look like this:
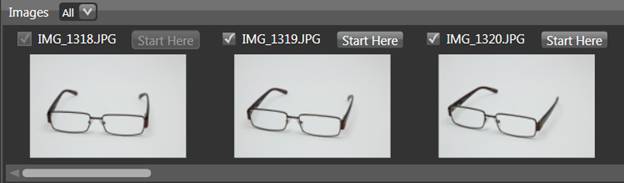
To fix this, click "Start Here" on the second image which will make the beginning of the sequence start with that one. Deselect the first image by unchecking the checkbox above it. Your timeline should now look like this:
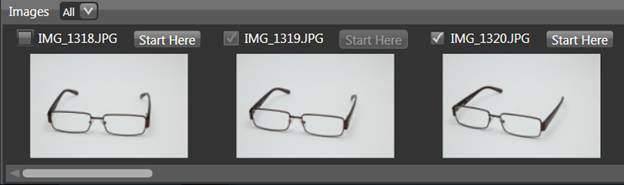
Experiment with this if you have a jump. In some cases the jump may be at the end, so you will have to do the same thing but at the end of the timeline.
Subject Moves: If you do not have too many frames but you have a jump, it is likely that the subject moved while the Z-Capture Device was rotating. This can be caused by several things, but the most probable cause of this is that the product was not secured to the surface and so began to fall over. If you have this problem, you need to secure your object and reshoot.
Z-Capture Device Did Not Rotate Properly: Sometimes the Z-Capture Device may get caught on something and will not rotate properly. This can create pauses or jumps. Fix your setup (find what it gets caught on) and reshoot.
Not Enough Frames: Sometimes you may not copy all of your frames and so you end up with a jump. Go back to your files and import the proper files. Re-import them into the Z-Capture Software.
Edit Photos
Once you have corrected any problems in your frames, you are ready to edit your photos. The controls for this are on the left side of the image (see diagram). Here are what each control means:
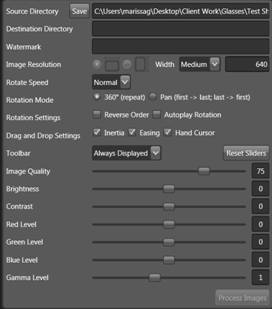
Destination Directory: This is where you will be saving your processed images.
Watermark: Some clients request a watermark in the image. In this area you would type the watermark requested.
Image Resolution: Unless requested by the client, keep these settings set to Medium and 640.
Rotate Speed: You can change how slow or fast the image will rotate. Unless otherwise specified, keep this setting at Normal.
Rotation Mode: Some clients may request to only have a pan around part of the subject instead of a complete 360° view. Unless requested, leave this setting at 360°(repeat).
Rotation Settings: With this control you can reverse the order of your images.
Drag and Drop Settings: This setting controls how the viewer of the exported rotation can control the pan by clicking on it.
Toolbar: This control allows you to have the bottom control bar always displayed or only when you hover over it.
Image Quality: You can adjust the quality of the image. If you increase the quality it will look great but take a long time to load. If you decrease the quality the image will not look good but it will load faster. Generally leave this setting at 75 unless otherwise requested.
Brightness: Controls the brightness of the image.
Contrast: Controls the contrast of the image.
Red Level: Controls the amount of red in the image. This is important for color balance.
Green Level: Controls the amount of green in the image. This is important for color balance.
Blue Level: Controls the amount of blue in the image. This is important for color balance.
Gamma Level: Controls the amount of gamma in the image. Like brightness, it controls the brightness of the subject.
As you edit, you may want to view your changes in a complete rotation. Each time you make a change to the settings you need to reload the Rotator Preview.
Export
Once you are finished editing, or you are editing a subject with a white background, be sure to test the rotator in a browser to make sure it blends with the background. For this you will need to export the image.
Do this by clicking on the "Destination Directory" and then locating your folder labeled Processed.

Next click "Process Images." Locate the folder you saved the processed file to and locate the "rotator.html" document. Open this file in a browser (I use Firefox) to preview the image. Watch for the following problems you may encounter, in which case you should reedit your images in the Z-Capture Software and then re-export to preview:
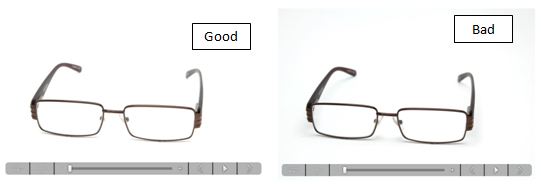
Background is off-white and does not blend with browser: If the background is too grey, try increasing the brightness, contrast, or gamma levels but be careful to not blow out your subject. Adjust the Red, Green, or Blue Level sliders if your background is off color. Below is an example of 2 of the same image but with different edits. As you can see, the one on the left blends well with the white background, while the one on the right has a visible border.
Flickering background: Try increasing your contrast. You may have to fix your setup and reshoot if you cannot get rid of this editing.
Moving Files to the Server
Once you have edited your images to be satisfactory, it is finally time to move the files to the server!
Double check that your files are named properly and that they look good one last time. Be sure not to delete them off your computer, though you should clean off your SD card so that you can take more photos. Copy and paste the finished files to the proper place on the server.
Before disassembling, be sure to record everything on your Photo Production Log and to run the files past the client. After this, you are finished!